How to Choose Clothing Size Stickers That Remove Cleanly
Choosing clothing size stickers means balancing two jobs: keeping sizes visible while garments are handled and letting customers peel the labels away without residue or fabric damage. A sticker that works well on a smooth cotton tee may behave differently on brushed fleece, coated outerwear or a delicate knit.
The safest buying decision starts with adhesive compatibility, not sticker shape or price. Ask for samples intended for temporary garment marking, test them on your actual products and check removal after realistic storage. Then choose the format, printing method and order quantity that fit your retail operation.
Start with the adhesive, not the shape
“Removable” describes an adhesive’s intended behavior, but it is not a guarantee that it will release cleanly from every textile. Adhesion depends on the garment surface, application pressure, temperature and how long the sticker stays attached. That contact period is often called dwell time.
When comparing clothing size stickers, ask whether the adhesive is specifically intended for direct application to garments. A removable office label or shipping label is not an equivalent substitute just because it peels easily from paper or plastic.
Also distinguish temporary retail markers from washable clothing-name stickers. The latter are designed to stay attached through use and laundering, often on a compatible care-tag surface. That is a different requirement from a size marker customers should remove before wearing a garment.
The sticker’s face material matters too. Paper can tear during removal, while film may lift in one piece, but neither construction proves that the adhesive is suitable. Request information about the complete label, including its adhesive and any restrictions on textile use.
Match the adhesive to the finished garment
Fiber content alone cannot establish compatibility. Two polyester garments can have very different textures, dyes and surface treatments. Fabric construction and finishes may change both how securely a sticker holds and how it releases.
Choose clothing size stickers for the finished product you sell, not merely for a fabric category listed in a catalog.
| Garment surface | What to watch for | Sensible starting approach |
|---|---|---|
| Smooth cotton jersey | Stretching during removal and differences between finishes | Test on the finished garment with the fabric relaxed |
| Denim or textured woven fabric | Uneven contact, edge lifting and changes to the surface appearance | Check both holding performance and the area after removal |
| Brushed fleece, velvet or other raised-pile fabrics | Fiber pickup, pile flattening and visible disturbance | Prefer a hanger or hangtag marker unless direct application is validated |
| Silk, fine knits or loosely constructed fabrics | Snagging, stretching and visible marks | Avoid direct application without garment-specific approval and testing |
| Coated or performance fabrics | Interaction with coatings, prints or surface treatments | Confirm suitability with the garment and label suppliers |
Do not respond to lifting edges by automatically choosing a stronger adhesive. That may solve the display problem while creating a removal problem. Moving the size information to a hangtag, package or hanger can be the better option.
Test different colorways when their dyes or finishes differ. Include decorated garments separately rather than assuming a result on plain fabric also applies to screen printing, transfers or embroidery.
Choose a format that reduces unnecessary contact
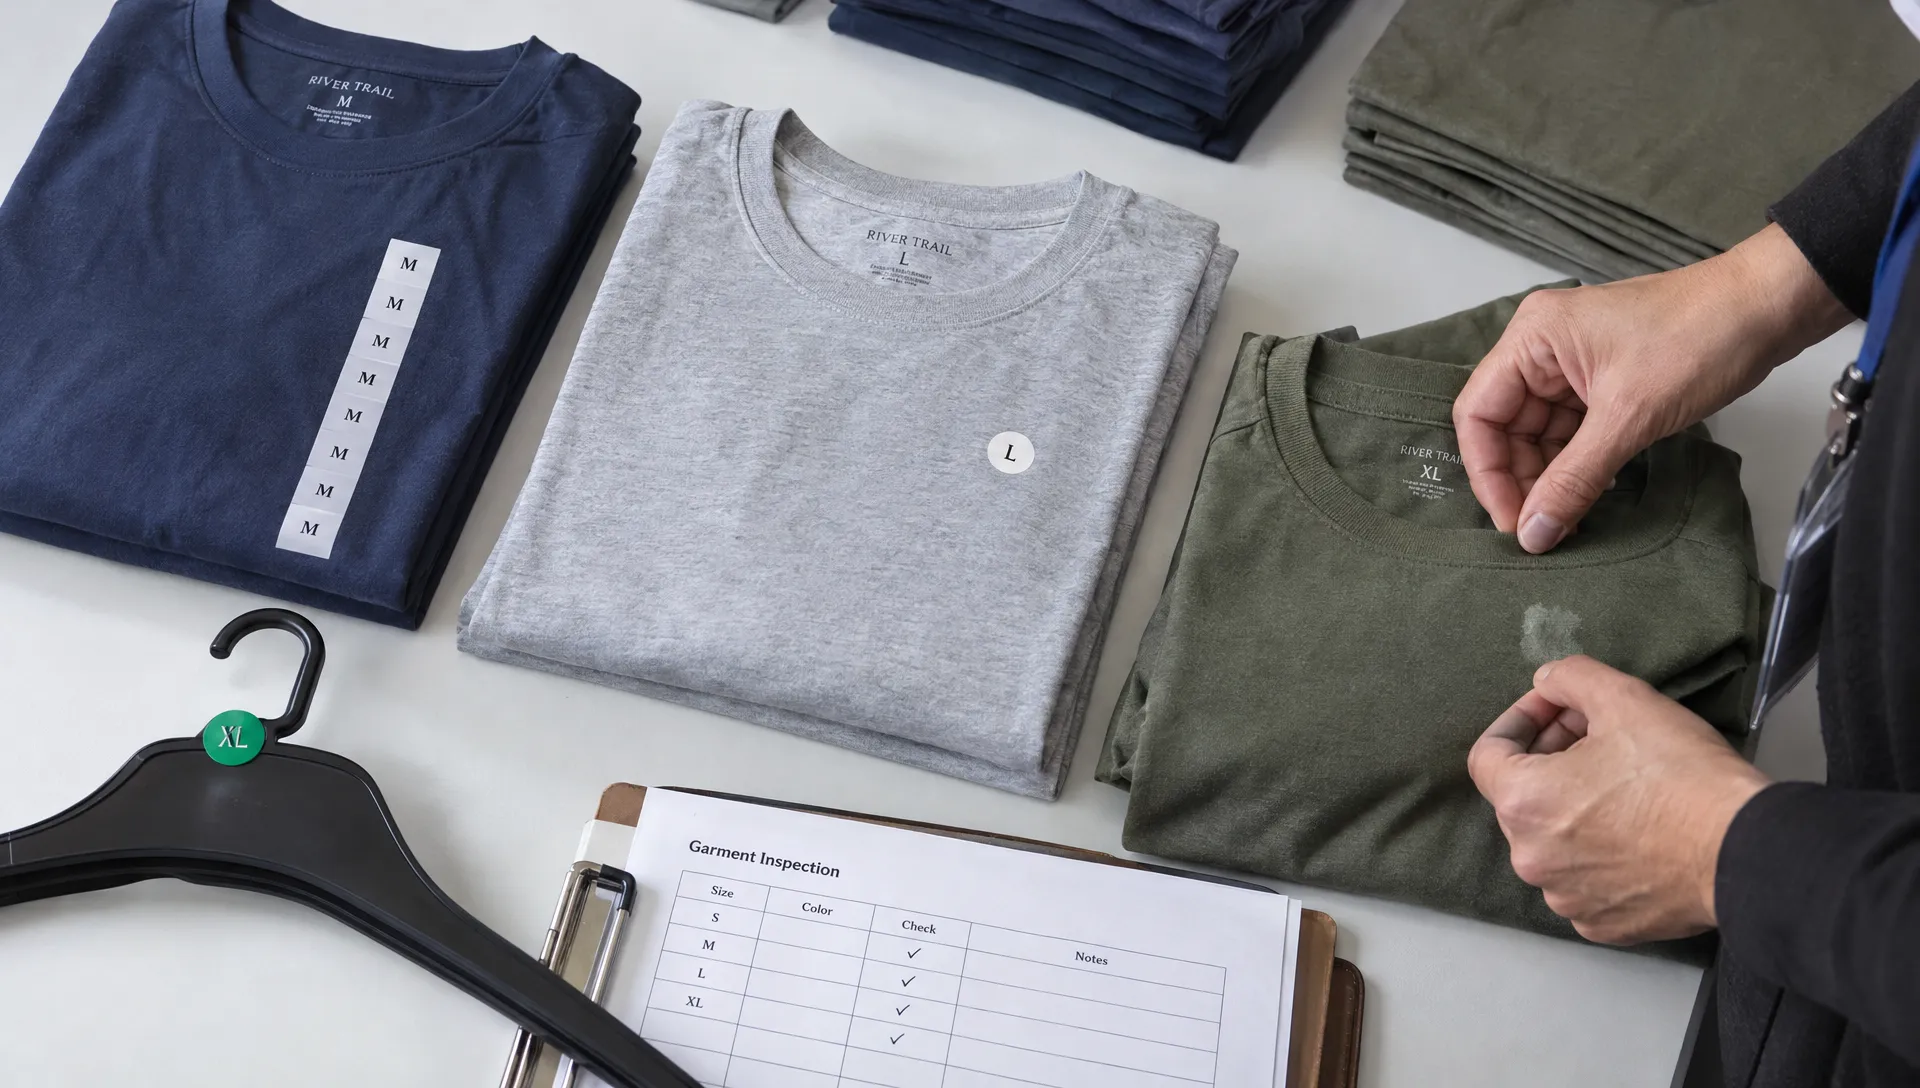
Long size strips work well when shoppers need to identify folded garments without unfolding the stack. Round dots and short rectangles suit smaller display areas. Color coding can help staff sort stock, but the printed size should remain clear without relying on color alone.
For clothing size stickers applied directly to fabric, choose enough surface area to stay readable and handle normally, rather than making the adhesive footprint larger for appearance alone. A larger sticker creates more contact and more material to peel away.
Check the design on a real folded garment. The size should remain visible in the stack without wrapping around an edge, bridging a seam or sitting over a textured decoration. Keep size text prominent; a logo should not make “M” or “32” difficult to distinguish.
Where size systems could be confused, include the relevant category or market designation. Numeric sizing for different regions is not interchangeable.
For hanging merchandise, a marker designed for the hanger may avoid garment contact entirely. Test that surface separately, particularly if the marker must also come off cleanly when hangers are reused. An adhesive suitable for a hanger is not automatically suitable for clothing.
How to test clothing size stickers before ordering
A useful sample test reproduces your actual handling and storage conditions. Peeling a freshly applied sticker off a fabric swatch tells you little about how it will behave after weeks in a stockroom.
Use this practical in-house procedure before committing to a bulk order:
- Select representative garments. Include each relevant fabric, finish and decoration, with particular attention to delicate or high-value items. Use approved test pieces rather than saleable stock when damage is possible.
- Apply consistently. Follow the supplier’s instructions on clean, dry garments. Keep placement and pressure consistent, and leave nearby fabric unstuck as a comparison area.
- Reproduce normal handling. Fold, stack, pack and unpack the garments as your team normally would. Check whether edges lift or stickers transfer to adjacent items.
- Test realistic dwell times. Include a short contact period and your longest expected stockholding period where practical. A brief screening test does not validate months of storage.
- Remove and inspect. Follow the recommended removal method, then check for tackiness, discoloration, transferred fibers, surface disturbance and changes to printed decoration. Inspect again later for marks that were initially hard to see.
Record the garment reference, sticker product, application date, storage conditions and result. Photographs help your team compare samples consistently. Define a pass as both adequate holding performance and acceptable removal, not simply “the sticker came off.”
If a supplier changes the adhesive or label construction, repeat the relevant checks before using the replacement across your inventory.
Compare preprinted stickers with printable sheets
Preprinted rolls are convenient when you use a stable size range in repeat quantities. They reduce in-house setup and let staff apply consistent markers quickly. Before ordering, check the quantity supplied for each size rather than assuming every size needs an equal allocation.
Printable clothing size stickers can suit short runs, unusual sizing or frequent wording changes. However, the sheet’s compatibility with your printer says nothing by itself about compatibility with your garments. Both requirements need to be satisfied.
Confirm whether the stock is intended for inkjet, laser or another specific printing process. Use the correct template and feed settings, and test whether the finished print remains legible during handling. Do not run an unidentified adhesive sheet through a printer, especially one that uses heat.
For branded designs, keep customization restrained. Clear size text, sufficient contrast and accurate alignment matter more than filling every available space. Order or print a sample at actual size before approving artwork.
Finally, include staff time, misprints and unused sizes when comparing costs. The lowest price per blank sheet is not necessarily the lowest cost per usable marker.
Confirm these details with the supplier
Ask for the intended application and any excluded fabrics in writing. Useful documentation identifies the product and its adhesive, rather than describing it only as “easy peel.” Check whether the supplier specifies a maximum recommended contact period, storage conditions or removal instructions.
Clarify what any clean-removal claim actually covers. Was the label evaluated on textiles or only on smooth, rigid surfaces? Does the claim apply to your intended storage period? Supplier information helps narrow the options, but it does not replace testing your finished garments.
For rolls, confirm the outside diameter, core size, winding direction and compatibility with your dispenser. For sheets, verify dimensions and layout. Release liners should also work reliably with your application process, since difficult dispensing can lead staff to overhandle the adhesive.
Before buying clothing size stickers locally or online, verify the exact stock code, available sizes, quantity per roll or sheet and dispatch timing. Ask whether samples use the same construction as the production order. Avoid accepting an untested substitution simply because it has the same shape and printed size.
Remove stickers without adding another source of damage
Follow the label supplier’s removal instructions first. In general, support the garment close to the sticker and peel slowly back over the label itself rather than pulling sharply upward. Stop if the fabric stretches, fibers lift or a printed surface begins to move.
Do not use a fingernail or scraping tool to dig adhesive out of delicate fabric. Avoid applying heat, alcohol, oil or a commercial adhesive remover unless the garment supplier has approved the method for that material and finish. A treatment that dissolves adhesive may also affect dyes, coatings or decoration.
If clothing size stickers leave residue during a trial, treat that as a failed compatibility test rather than building cleanup into your normal workflow. Isolate affected stock and contact the supplier with the product reference, photographs and application details. Do not assume laundering will remove an unknown adhesive safely.
Frequently asked questions
Can one removable sticker work on every fabric? Do not assume so. A supplier may offer a product for several garment types, but delicate fabrics, raised-pile surfaces and coated materials still need separate consideration. Test the finished garments you plan to label.
How long can a size sticker stay on clothing? There is no universal safe period. Use the supplier’s stated limits and validate your expected stockholding time. If merchandise may remain unsold for months, a same-day removal test is insufficient.
Are hanger markers better than direct-to-fabric stickers? They are often the lower-contact choice for delicate or difficult surfaces. However, they must stay with the correct garment throughout merchandising. Direct markers may be more convenient for folded stock when compatibility has been established.
Can clothing size stickers replace permanent garment labels? Temporary size markers serve a retail-display purpose. They should not be treated as a substitute for required product information. U.S. sellers should review the FTC’s textile labeling requirements and applicable care-labeling rules separately.
Plan temporary and permanent labels together
Use temporary markers to help customers find their size, then plan lasting identification for the garment itself. HiLabels offers custom woven labels and care labels for that permanent role. Its guide to choosing custom fabric tags for clothing brands can help you consider construction and placement, while HiLabels provides options for creating your brand’s garment labels.


