How to Make a Paracord Zipper Pull That Holds Up
A paracord zipper pull is one of the simplest upgrades you can make to a bag, jacket or gear pouch, but the difference between a handy pull and one that fails after a week comes down to small construction choices. Cord diameter, loop length, knot tension and how you finish the ends all matter. This guide focuses on durability first, so you can make a pull that is comfortable in your hand, easy to grab with gloves and secure enough for daily use. The steps work for backpacks, outdoor shells, duffel bags, camera cases, tool rolls and handmade accessories.
Materials for a paracord zipper pull that will last
The best materials are not always the most decorative ones. For a zipper, you need cord that bends cleanly through the slider tab, has enough texture to grip and can handle friction without shedding fibers. Standard 550 paracord is popular because it is strong, widely available and easy to knot, but thinner cord can be better for small zippers.
| Material or tool | What to look for | Why it matters |
|---|---|---|
| Paracord | 2 mm to 4 mm cord for most bags and jackets | Balances grip, flexibility and bulk |
| Scissors | Sharp fabric or utility scissors | Leaves a clean cut before sealing |
| Lighter or heat tool | Controlled flame or low heat | Melts synthetic cord ends to reduce fraying |
| Tweezers or pliers | Smooth jaws if possible | Helps tighten knots without chewing the cord |
| Ruler | Inch or centimeter markings | Keeps multiple pulls consistent |
For a daily-use paracord zipper pull, choose cord that compresses slightly when pinched but does not flatten into a ribbon. Very stiff cord can make the zipper awkward to operate, especially on curved pockets. Very soft craft cord may look good at first but loosen as it absorbs movement, dirt and moisture.
If you are comparing cord types for outerwear, pouches or backpacks, HiLabels has a helpful guide on how to choose the right zipper pull cord for bags and outerwear before you commit to one material.
What makes a zipper pull fail?
Most failures happen at one of three points: the attachment loop, the knot body or the sealed ends. A pull can look tight on the workbench and still come apart because the knot was not dressed correctly, the ends were cut too short or the cord was too thick for the slider opening.
A durable pull should meet four basic requirements. It should move freely through the zipper slider, give your fingers enough surface area to grip, resist loosening under repeated tugging and avoid sharp melted blobs that scratch hands or fabric.
This is also where intended use matters. A fashion pouch may need a slimmer, cleaner pull. A winter jacket benefits from a larger loop that can be used with gloves. A hiking pack needs a pull that will not snag constantly on brush, straps or buckles.
Step 1: Measure the cord before cutting
For most zippers, start with 8 to 10 inches of paracord. This gives you enough length to form a loop, tie a compact knot and trim the ends neatly. Small pouches may need only 6 inches. Large backpacks or gloved use may need 12 inches.
Before cutting, fold the cord in half and hold it against the zipper slider. The finished loop should usually extend about 1.5 to 2.5 inches from the slider. Anything shorter can be hard to grab. Anything longer may swing, snag or slap against the product while walking.
The most reliable paracord zipper pull starts with a little extra cord because trimming is easy, adding length after the knot is not. If you are making a set for a bag with multiple compartments, cut all pieces to the same length first so the finished pulls look intentional.
Step 2: Thread the loop through the zipper slider
Fold the cord in half so the two cut ends meet. Push the folded midpoint through the hole in the zipper slider tab. If the slider hole is narrow, compress the fold with pliers or use a thin wire loop to guide it through.
Once the folded end is through, pass the two cut ends through that folded loop and pull gently. This creates a girth hitch, also called a lark’s head knot, around the slider tab. Tighten it evenly so both sides of the loop sit flat and parallel.
Do not yank hard yet. First, check that the cord does not jam the slider or prevent the zipper from sitting flat. If the attachment feels bulky, use thinner cord or switch to a split ring between the slider and cord.
Step 3: Tie a compact stopper knot
A stopper knot gives your fingers something to hold and keeps the two cord ends from separating. The easiest durable option is a simple overhand knot using both strands together. For a cleaner outdoor look, use a diamond knot, also called a lanyard knot, but practice on scrap cord first because it takes more care to tighten evenly.
To tie the simple version, hold both loose strands together and make one overhand knot about 1.25 to 1.75 inches below the slider. Pull the two strands through the loop, then tighten slowly while shaping the knot with your fingers. The knot should be dense, centered and smooth.
A paracord zipper pull does not need a complicated knot to be strong. In many cases, a neatly dressed simple knot lasts longer than a decorative knot that has gaps, crossed strands or uneven tension.
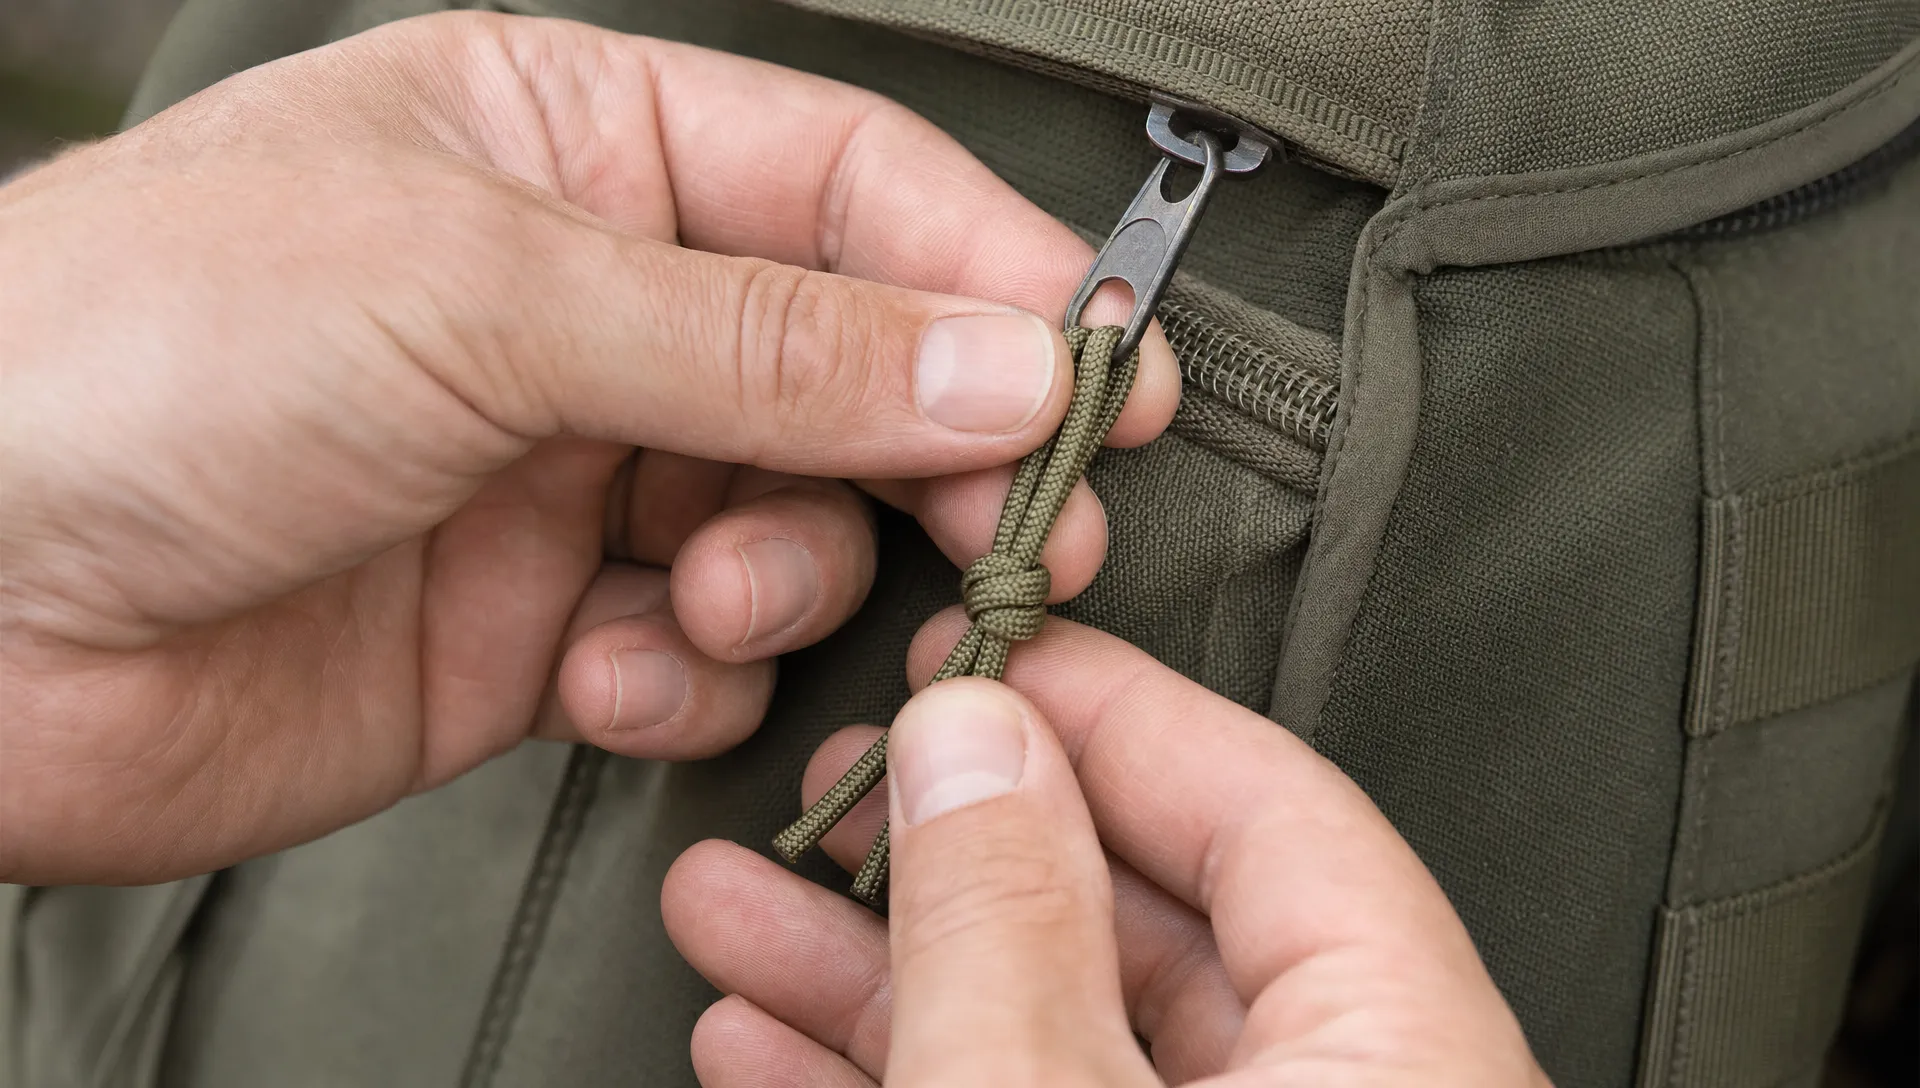
Step 4: Tighten, trim and seal the ends
After the knot is shaped, pull on the loop and the cord ends several times to set the tension. Tighten gradually rather than using one hard tug. This helps the knot compact evenly and reduces the chance of one strand slipping more than the other.
Trim the loose ends to about 1/8 to 1/4 inch beyond the knot. Shorter ends can pull back into the knot before sealing. Longer ends may feel scratchy or look unfinished.
Use a lighter carefully to melt the cut ends. Hold the flame close enough to soften the fibers but not so close that the cord catches fire. Once the ends turn glossy, press them gently against the side of the knot with the metal body of the lighter, pliers or a scrap tool. Do not use your bare fingers.
For a cleaner finish, melt one end at a time. If the sealed end forms a sharp bead, reheat it slightly and flatten it. The goal is a smooth cap that resists fraying without becoming bulky.
Step 5: Test the pull like it will be used
A pull that survives one gentle tug is not necessarily ready for daily use. Open and close the zipper 20 to 30 times while pulling from different angles. Try it with dry hands, wet hands and gloves if the item will be used outdoors.
A well-made paracord zipper pull should stay centered on the slider and the knot should not migrate down the cord. If the loop tightens unevenly, remove the pull and retie it before sealing. If the zipper feels harder to operate, the cord may be too thick for the slider.
Use this quick test before putting the item back into service:
| Test | What to check | Fix if it fails |
|---|---|---|
| Straight pull | Knot stays tight and loop does not stretch | Retie and tighten more evenly |
| Side pull | Cord does not twist out of the slider tab | Use a smaller loop or split ring |
| Glove grip | Pull is easy to find and hold | Make the loop longer or knot larger |
| Snag test | Pull does not catch on nearby straps | Shorten the loop or use thinner cord |
If you are replacing a missing tab rather than adding a pull to an intact slider, check the slider condition first. A damaged slider can cut cord or release the attachment, so review the steps for how to install a zipper pull that stays secure before you finish the repair.
Knot options ranked by durability
Different knots create different grip, bulk and appearance. For most people, the best choice is the knot you can tie consistently and tighten fully.
| Knot style | Durability | Best use | Skill level |
|---|---|---|---|
| Two-strand overhand | Good | Everyday bags, jackets and pouches | Beginner |
| Figure-eight stopper | Very good | Outdoor gear and larger zippers | Beginner to intermediate |
| Diamond knot | Very good | Premium handmade accessories | Intermediate |
| Cobra weave tab | Good but bulky | Large packs and decorative pulls | Intermediate |
The figure-eight stopper is a strong upgrade if you want a bigger grip without too much bulk. It also tends to untie less easily than a loose overhand knot. The diamond knot looks polished and compact, which makes it useful for handmade bags, small-batch apparel and accessories where the pull is part of the design.
Avoid loose decorative wraps unless they are stitched, glued or locked with a proper finishing knot. Movement at the zipper creates constant micro-tension, and decorative knots that are not locked down will slowly open.
Common mistakes that shorten the life of the pull
The most common mistake is using too much cord. Oversized pulls feel fun at first, but they catch on seat belts, branches, storage hooks and other zipper pulls. Over time, that snagging puts extra force on the slider tab.
Another mistake is sealing the cord before the knot is fully tightened. Once the ends are melted, you have less room to adjust the knot. Tie, dress, test and only then seal.
A paracord zipper pull can also fail when the melted end is left sharp. That small hard edge may scratch the product, irritate fingers or wear against the other strand. A smooth flattened seal is stronger and more comfortable.
If you are teaching this as a group project for outdoor clubs, maker workshops or students, it works well because the finished object is useful and the process builds patience, responsibility and attention to detail. That kind of practical learning connects naturally with schools and communities that value real-world application, including Colegio Pioneros Costa’s adaptive learning model, where student autonomy, nature connection and purposeful work are part of the educational culture.
When to choose a custom zipper pull instead
Handmade paracord is excellent for repairs, outdoor kits and small personal projects. For products you sell, the decision is different. Consistency, branding, color matching and repeatable quality matter more when the pull is part of the customer’s first impression.
For a brand, a pull can do more than help someone open a pocket. It can mark the main compartment, reinforce a color system or add a small branded detail to a jacket, pouch, backpack or accessory line. HiLabels explains this broader role in its guide to how zipper pulls boost function and branding.
If you like the utility of cord but need a more polished brand finish, consider pairing paracord-style usability with custom zipper pulls, woven labels, care labels or patches. The right combination can make a product feel finished without adding unnecessary complexity.
Care tips after installation
Once installed, inspect the pull every few months if the item sees heavy use. Look for fuzzing near the slider, a loosening knot or cracking at the melted ends. Dirt and grit can act like sandpaper, especially on backpacks, outdoor jackets and gear bags.
To clean the pull, wipe it with a damp cloth and mild soap. Avoid soaking it in harsh chemicals because some cords can lose color or become brittle. If the pull gets badly frayed, replace it rather than trying to rescue it with more heat. Excessive melting can make the cord stiff and uncomfortable.
A well-built paracord zipper pull is inexpensive enough to replace when needed, but careful finishing can extend its life significantly. The best sign of success is boring reliability: it opens the zipper smoothly, feels good in the hand and stays out of the way until needed.
Frequently Asked Questions
What size paracord works best for zipper pulls? Most bags and jackets work well with 2 mm to 4 mm cord. Standard 550 paracord is comfortable for medium and large zippers, but smaller pouches often need thinner cord to avoid bulk.
Can I make a paracord zipper pull without melting the ends? You can, but it will usually fray sooner. If the cord is synthetic, heat sealing is the cleanest finish. Natural fiber cord should not be melted, so use a tight whipping wrap or fabric-safe adhesive instead.
How long should the finished loop be? A finished loop of about 1.5 to 2.5 inches works for most uses. Go shorter for pouches and longer for winter jackets or gear that needs to be opened with gloves.
Which knot is strongest for a zipper pull? A figure-eight stopper or well-tightened diamond knot is usually stronger than a loose decorative knot. A simple two-strand overhand knot can also last well if it is tightened, trimmed and sealed correctly.
Will paracord damage a zipper slider? Usually no, as long as the cord fits freely through the slider tab and does not force the tab open. If the hole is too small, use thinner cord or attach the cord with a small split ring.
Build durable details into every product
A small detail can change how a product feels in daily use. If you are repairing one bag, a handmade pull may be all you need. If you are building a collection, selling accessories or refreshing branded apparel, consistent hardware and finishing details matter.
HiLabels helps brands and makers create custom labels, patches, ribbons, care labels and zipper pulls with a straightforward online ordering process. Explore the options at HiLabels when you are ready to turn practical finishing details into a more polished brand experience.


